

How to Fix a Facebook Pixel That Is Not Tracking Correctly
To fix Facebook Pixel not tracking correctly, advertisers must use the Meta Pixel Helper to confirm the tracking code fires with the correct Pixel ID,…
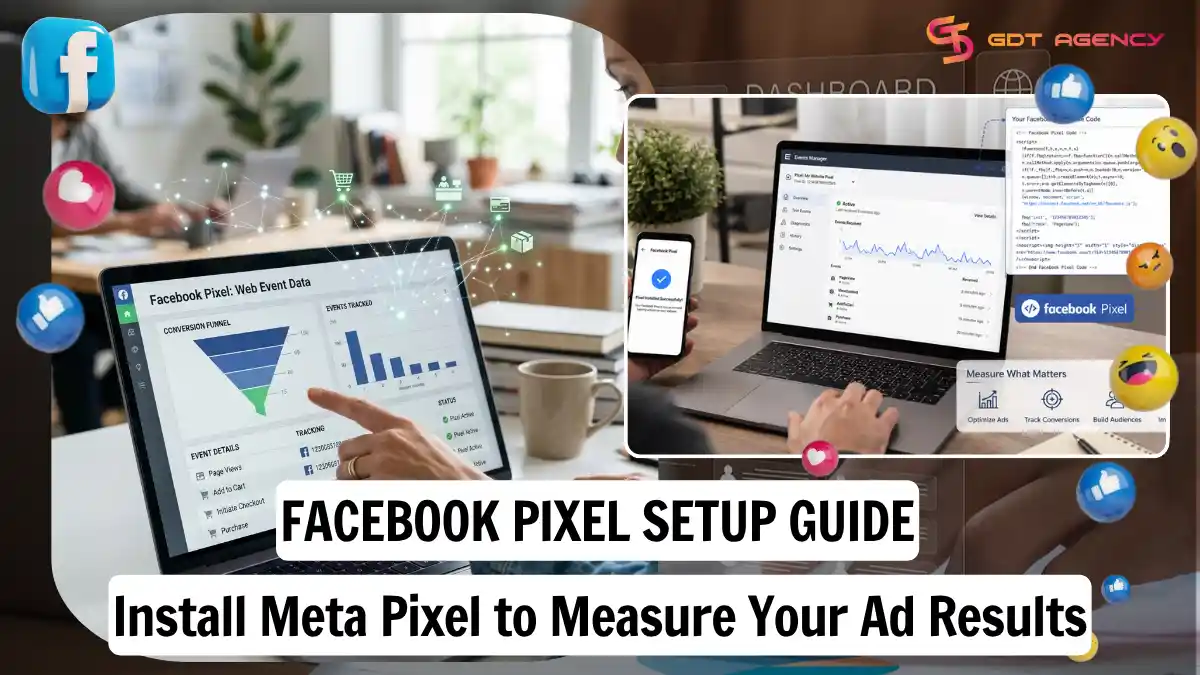
Meta Pixel is a tracking tool built by Meta that records visitor activity on your website and reports it back to your Facebook and Instagram ad account. Meta Pixel works by attaching a unique Pixel ID to your website and running a small JavaScript snippet that records visitor behavior in the background.
You install Meta Pixel by copying a code snippet from Events Manager and placing it on your website, either directly in the header or through a partner platform like Shopify or WordPress. The pixel then tracks visitor actions and sends that data back to your Meta Ads account, so you can measure ad results instead of guessing at them. This guide walks through the full setup process first, then covers those related questions in detail.
You set up events on Meta Pixel by choosing between two categories: standard events, which are pre-built and cover common actions, and custom conversions, which you define yourself for actions standard events do not capture.
A pixel that only records page views tells you very little about what actually matters to your business. Events are what turn a pixel from a basic visitor counter into a real measurement tool, since they tell Meta exactly which actions to watch for and report.
There are four standard events most businesses rely on: Purchase, Lead, AddToCart, and ViewContent. Meta groups these together because they cover the most common actions advertisers want to measure.
| Event | Fires When | Typical Use Case |
| Purchase | A visitor completes a transaction | E-commerce checkout confirmation |
| Lead | A visitor submits a form or expresses interest | Contact forms, quote requests |
| AddToCart | A visitor adds a product to their cart | Online stores |
| ViewContent | A visitor views a specific product or page | Product pages, service pages |
The table above lays out each standard event, the moment it fires, and where you would typically place it on your site. Each event comes with a pre-built code snippet from Meta, and your job is to place that snippet at the exact point in your website flow where the matching action happens, such as inside a checkout confirmation page for Purchase or inside a form handler for Lead.
You add custom conversions by defining a rule inside Events Manager, based on a URL pattern, an event parameter, or specific page behavior, without touching your website code again.
Standard events cover a lot of ground, but they do not cover everything. If you run a subscription business, a multi-step quote process, or anything specific to your industry that does not fit neatly into Purchase, Lead, AddToCart, or ViewContent, a custom conversion fills that gap. You set the rule once inside Events Manager, and Meta applies it going forward, which means you get a way to track something meaningful to your business without asking a developer to edit code every time your tracking needs change.
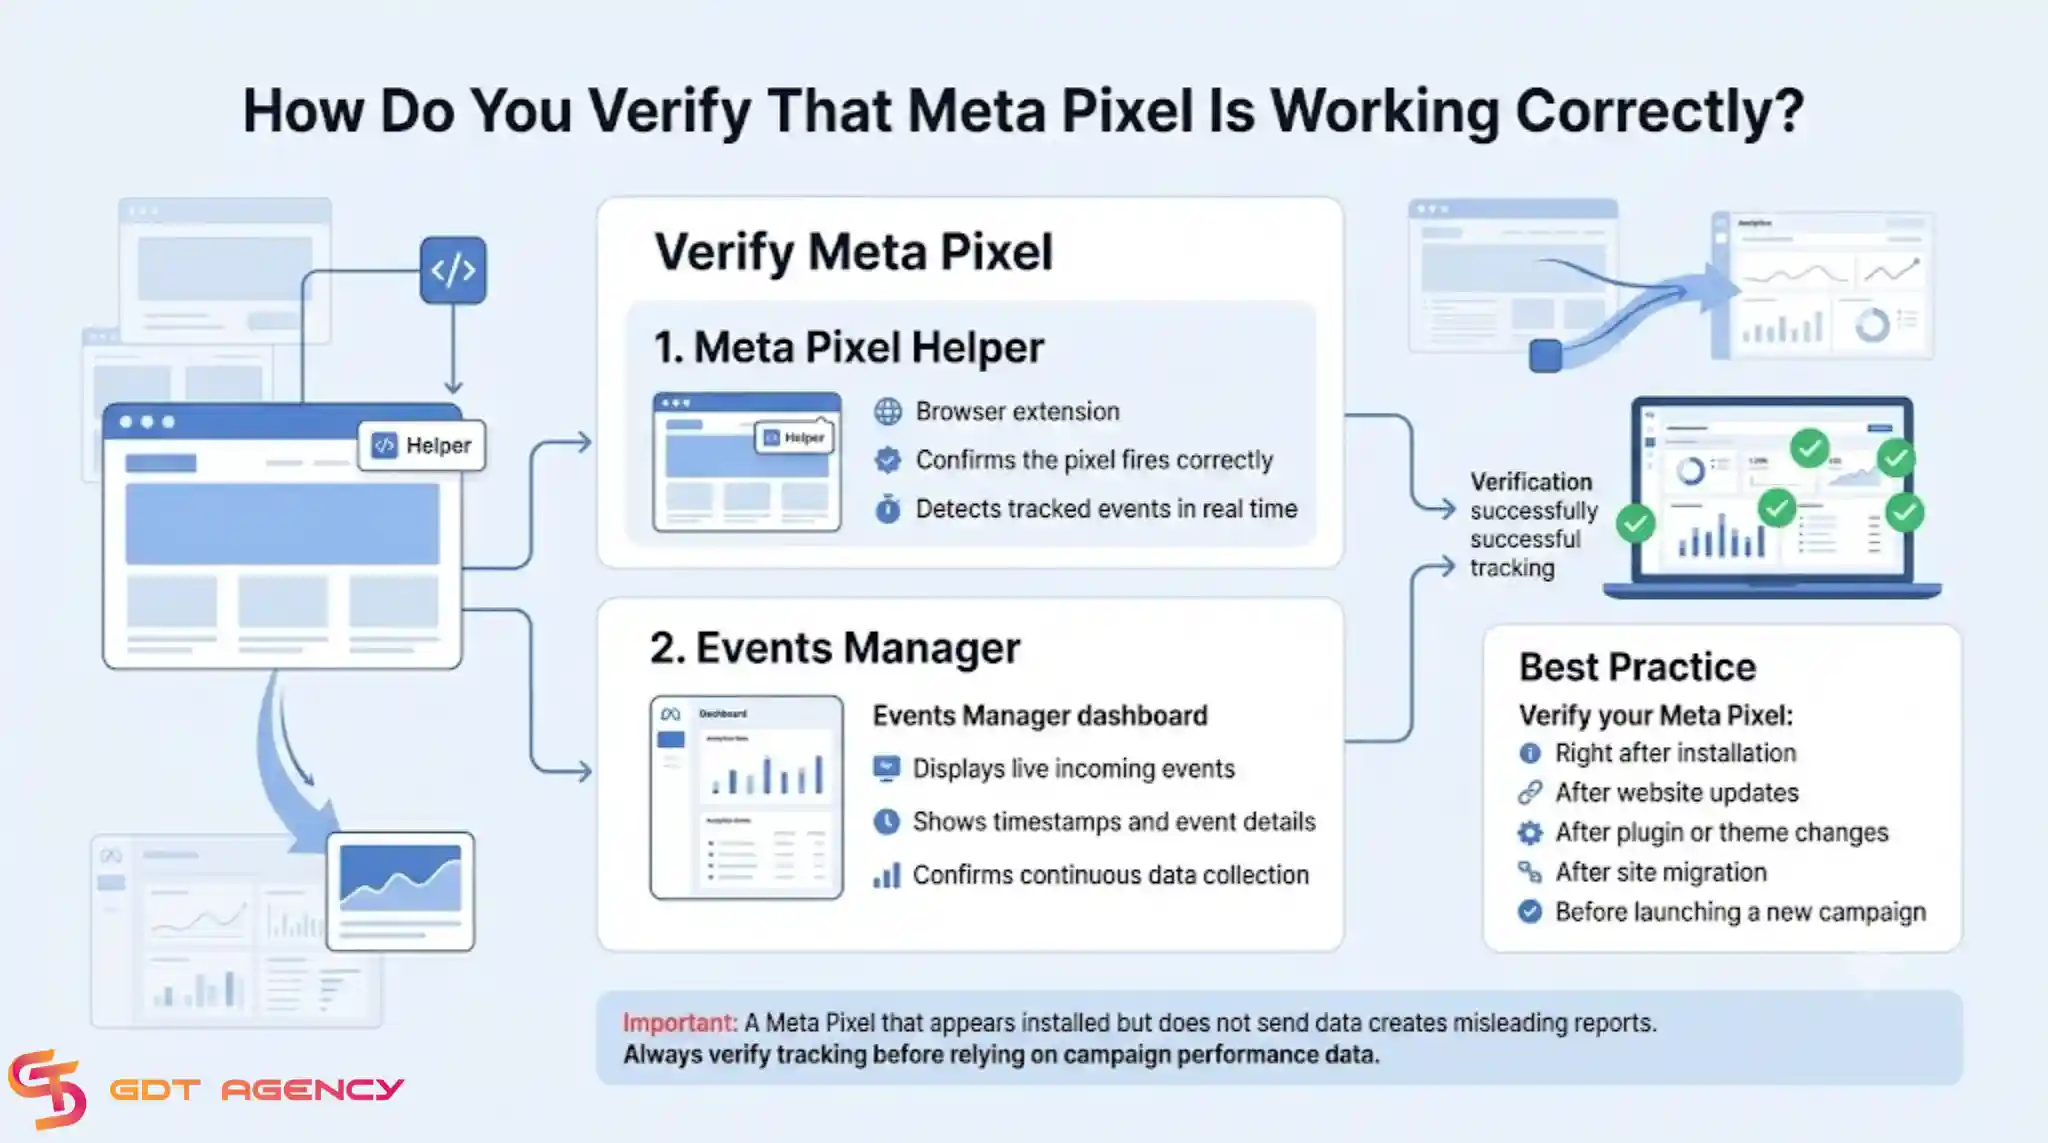
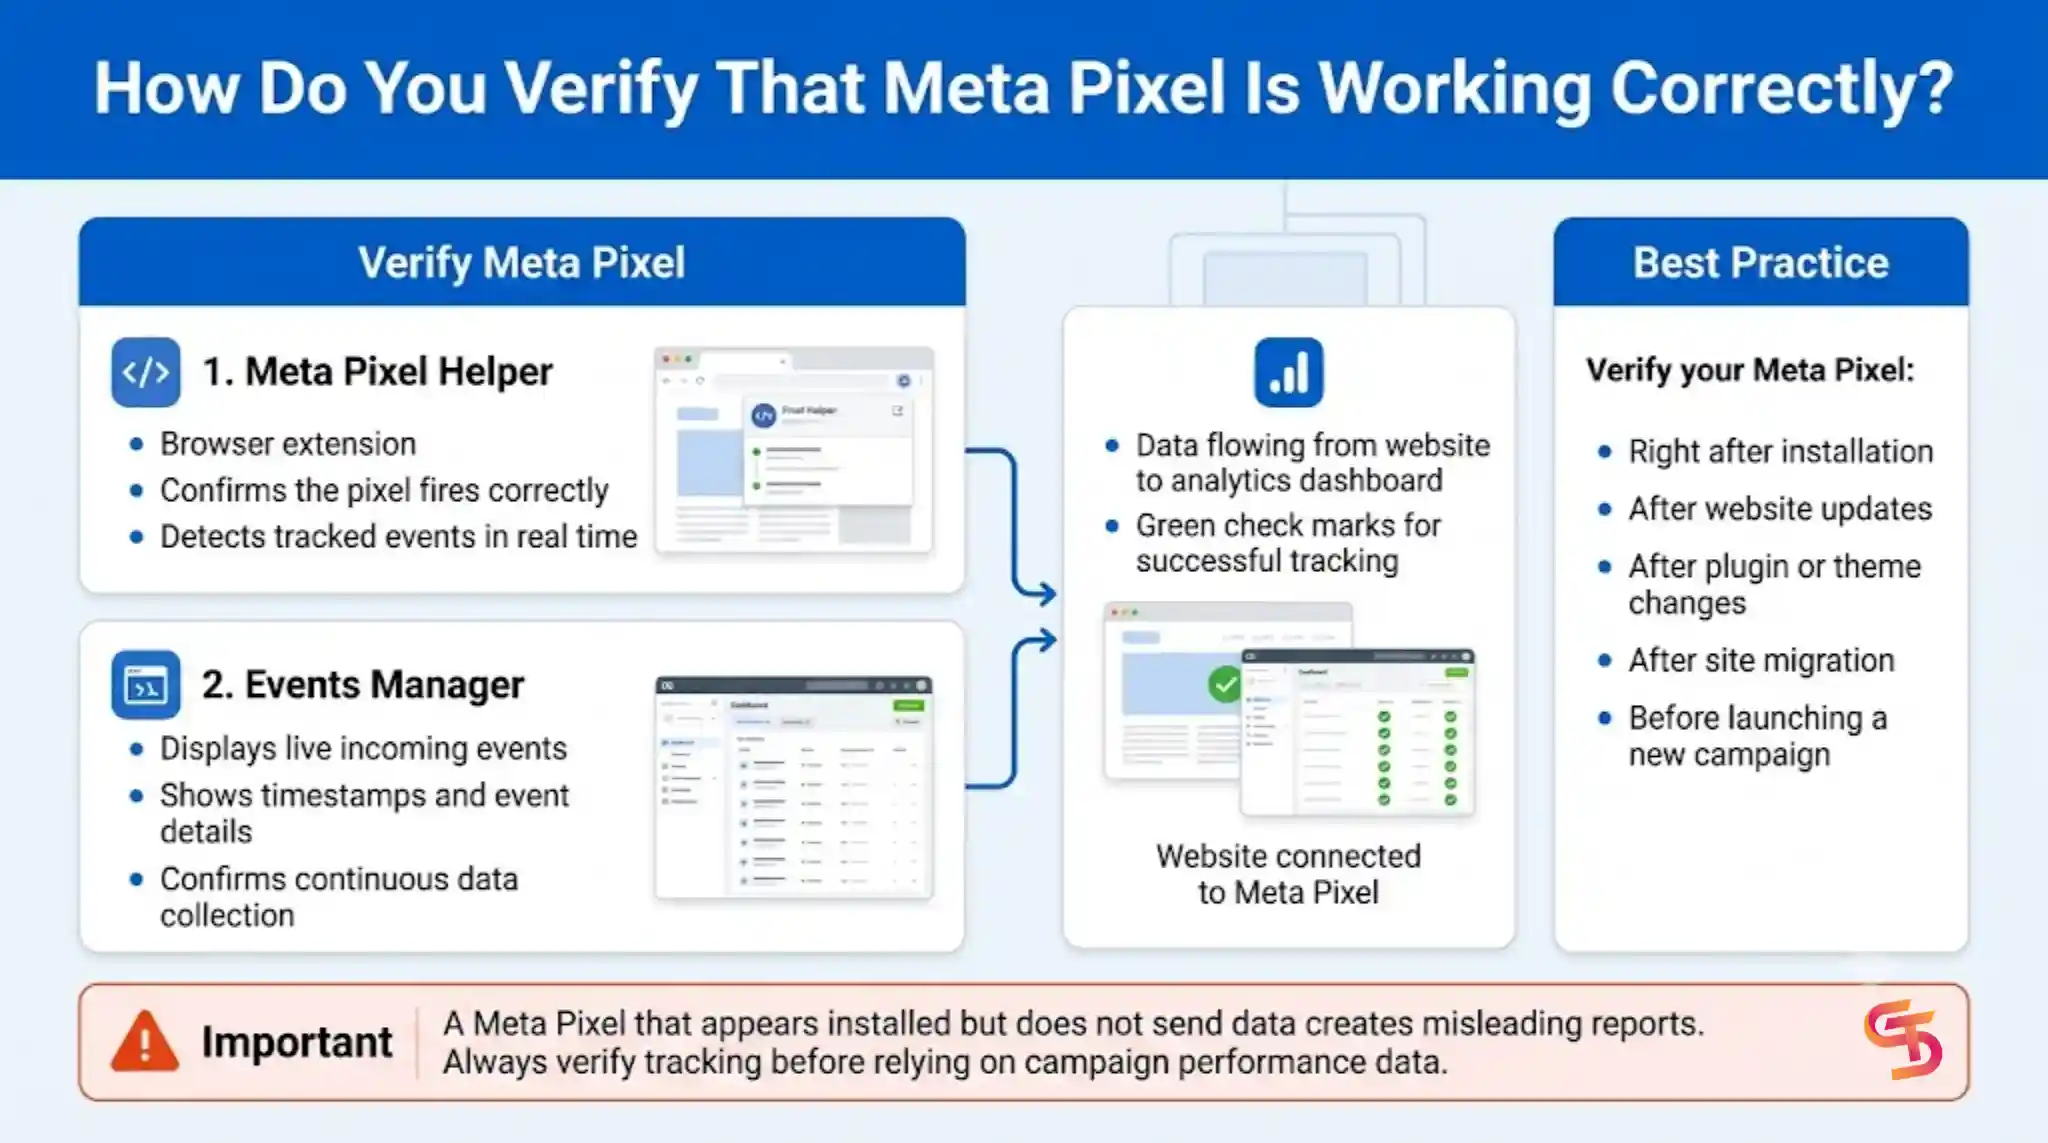
You verify Meta Pixel is working correctly by using two tools together: Meta Pixel Helper, a browser extension, and Events Manager, which shows a live feed of incoming events from your site.
A pixel that appears installed but never sends data gives you false confidence, and that is worse than knowing nothing at all, because you end up making decisions on numbers that were never actually being tracked.
Meta Pixel Helper checks the page you are currently viewing and tells you, in real time, whether a pixel fires and which events it picks up. Events Manager takes this further by showing a running feed of every event coming in from your website, along with timestamps and event details, so you can confirm data is arriving continuously rather than just once during setup.
Run both checks right after installation, and again after any meaningful update to your site. A theme change, a plugin update, or a full site migration can quietly break pixel placement without any visible sign on the front end. Treat verification as a recurring habit rather than a one-time task, especially before launching a new campaign that depends on accurate tracking.
You install Meta Pixel by creating it inside Events Manager first, then adding the resulting code to your website through one of two methods: direct code placement or a partner platform integration. Both methods lead to the same working result.
Before you pick a method, open Events Manager and create your pixel there. Meta generates a base code tied to that pixel, and this code is what you will use in the next step, regardless of which installation path fits your website.
You add pixel code directly by copying the base code from Events Manager and pasting it into your website's header, right before the closing </head> tag. This method works for any custom-built website.
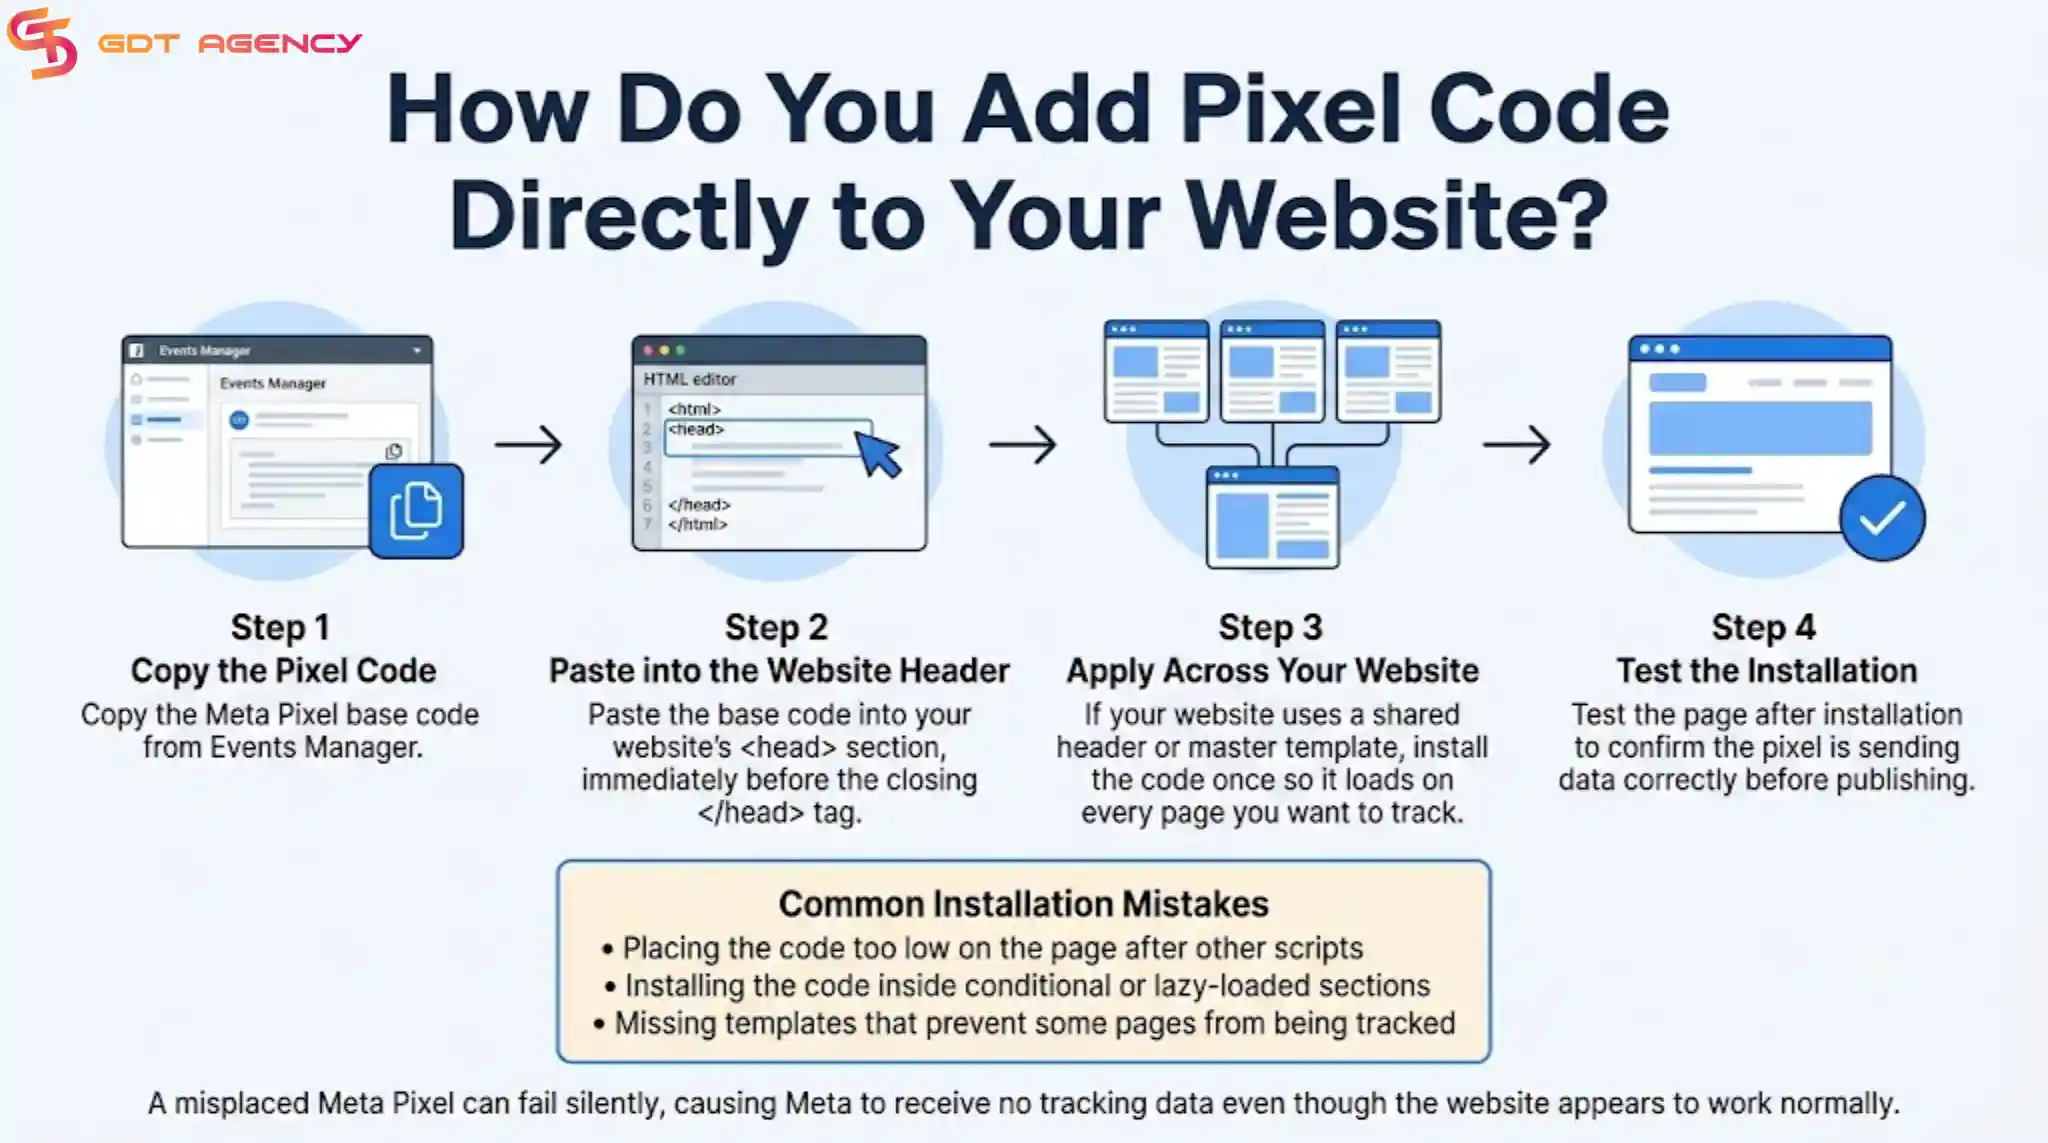
For this to work correctly, place the code on every page you want tracked. If your site uses a shared header or master template, you only need to add the code there once, and it applies across the whole site automatically.
Placement is where most manual installs go wrong. A few common mistakes come up often enough to call out directly:
After you paste the code, test the page before moving on. A pixel that sits in the wrong spot can fail silently, meaning your site looks fine to visitors while Meta receives no data at all.
You install Meta Pixel through a partner platform by connecting your Pixel ID inside that platform's built-in Meta integration, without writing or editing any code yourself.
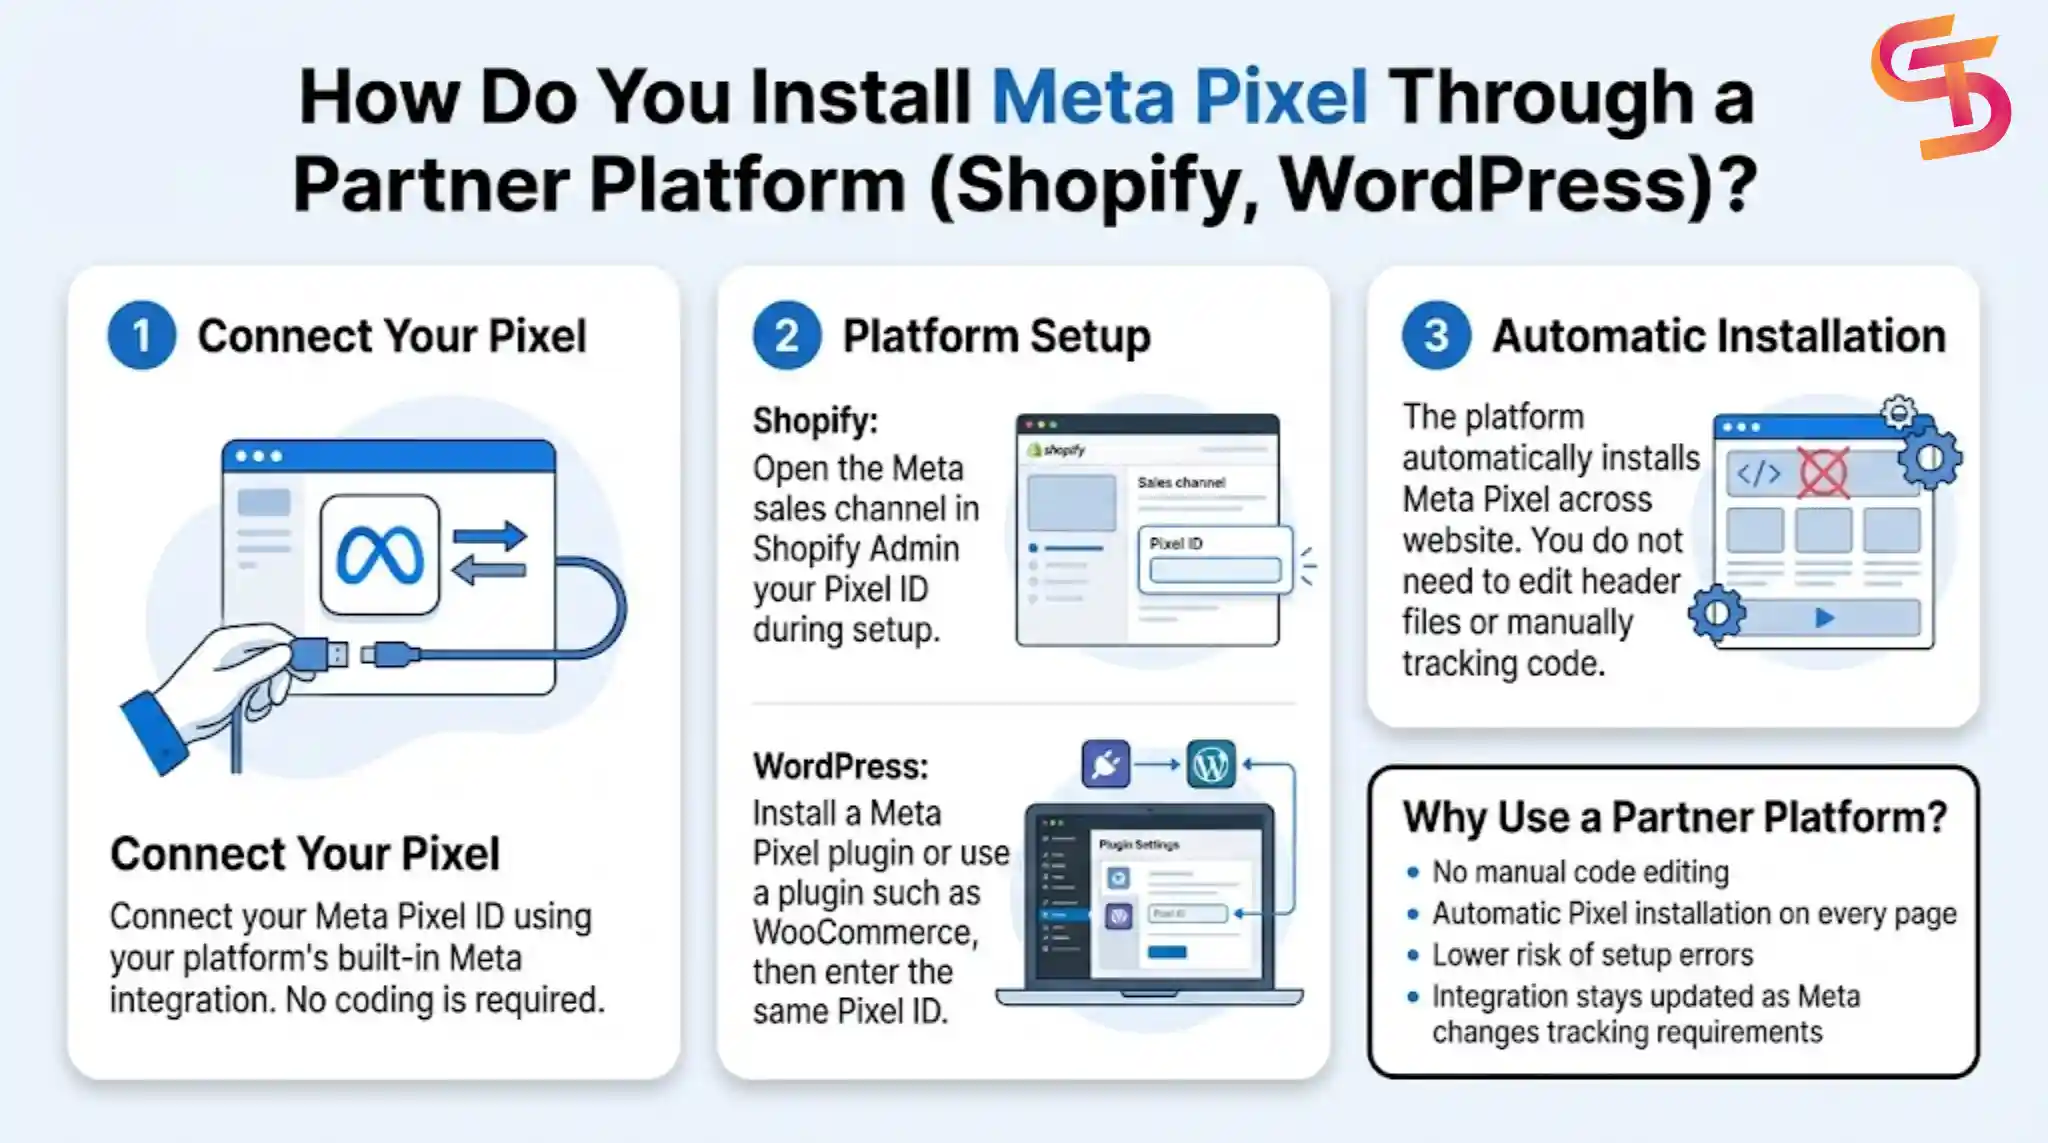
On Shopify, this means opening the Meta channel app from your Shopify admin panel and entering your Pixel ID during setup. On WordPress, you install a plugin built for Meta Pixel integration, or use a plugin like WooCommerce if your site runs an online store, and enter the same ID there.
This route removes almost all of the risk that comes with manual placement. You are not editing header files or guessing where a script should sit. The platform handles code injection on every page automatically, and it tends to update the integration when Meta changes its tracking requirements, so you are less likely to end up with an outdated setup months later.
Meta Pixel measures your ad results by matching event data from your website against your active ad campaigns inside Ads Manager, which produces concrete numbers like cost per purchase, conversion rate, and return on ad spend.
Once your pixel and events are running, this connection happens automatically in the background. Every event your pixel sends carries details about the visitor, the page, and often the specific ad that brought them there. Meta uses this information to link outcomes back to individual campaigns, ad sets, and even single ads.
Inside Ads Manager, this data shows up as the numbers advertisers actually care about: cost per purchase, cost per lead, conversion rate, and ROAS (return on ad spend). Without this pixel data, Ads Manager would only show you click volume and spend, with no way to connect either one to whether those clicks turned into real business outcomes.
This same connection also feeds Meta's optimization system. When you set a campaign to optimize for Purchase, Meta studies the pattern of who actually converts based on pixel data, then shows your ad to more people who match that pattern. In that sense, the pixel does more than report results. It actively shapes where your ad budget goes next.
>>> After installing the Meta Pixel, make sure your Facebook ad account has an active payment method before launching campaigns. If you need to add, update, or troubleshoot your billing method, see our How to Manage Your Facebook Ad Account Payment Method guide for step-by-step instructions.
As an expert at GDT Agency who has spent more than 5 years working with Facebook ads and Facebook agency ad accounts, I know that Meta Pixel is a tracking tool built by Meta that records visitor activity on your website and reports it back to your Facebook and Instagram ad account. It works by running a JavaScript snippet in the background of your site.
To understand how this works in practice, start with the Pixel ID. Every pixel you create carries a unique ID number, and this ID is what ties your website's data to your specific Ads Manager account. Without it, Meta would have no way to know which website belongs to which advertiser.
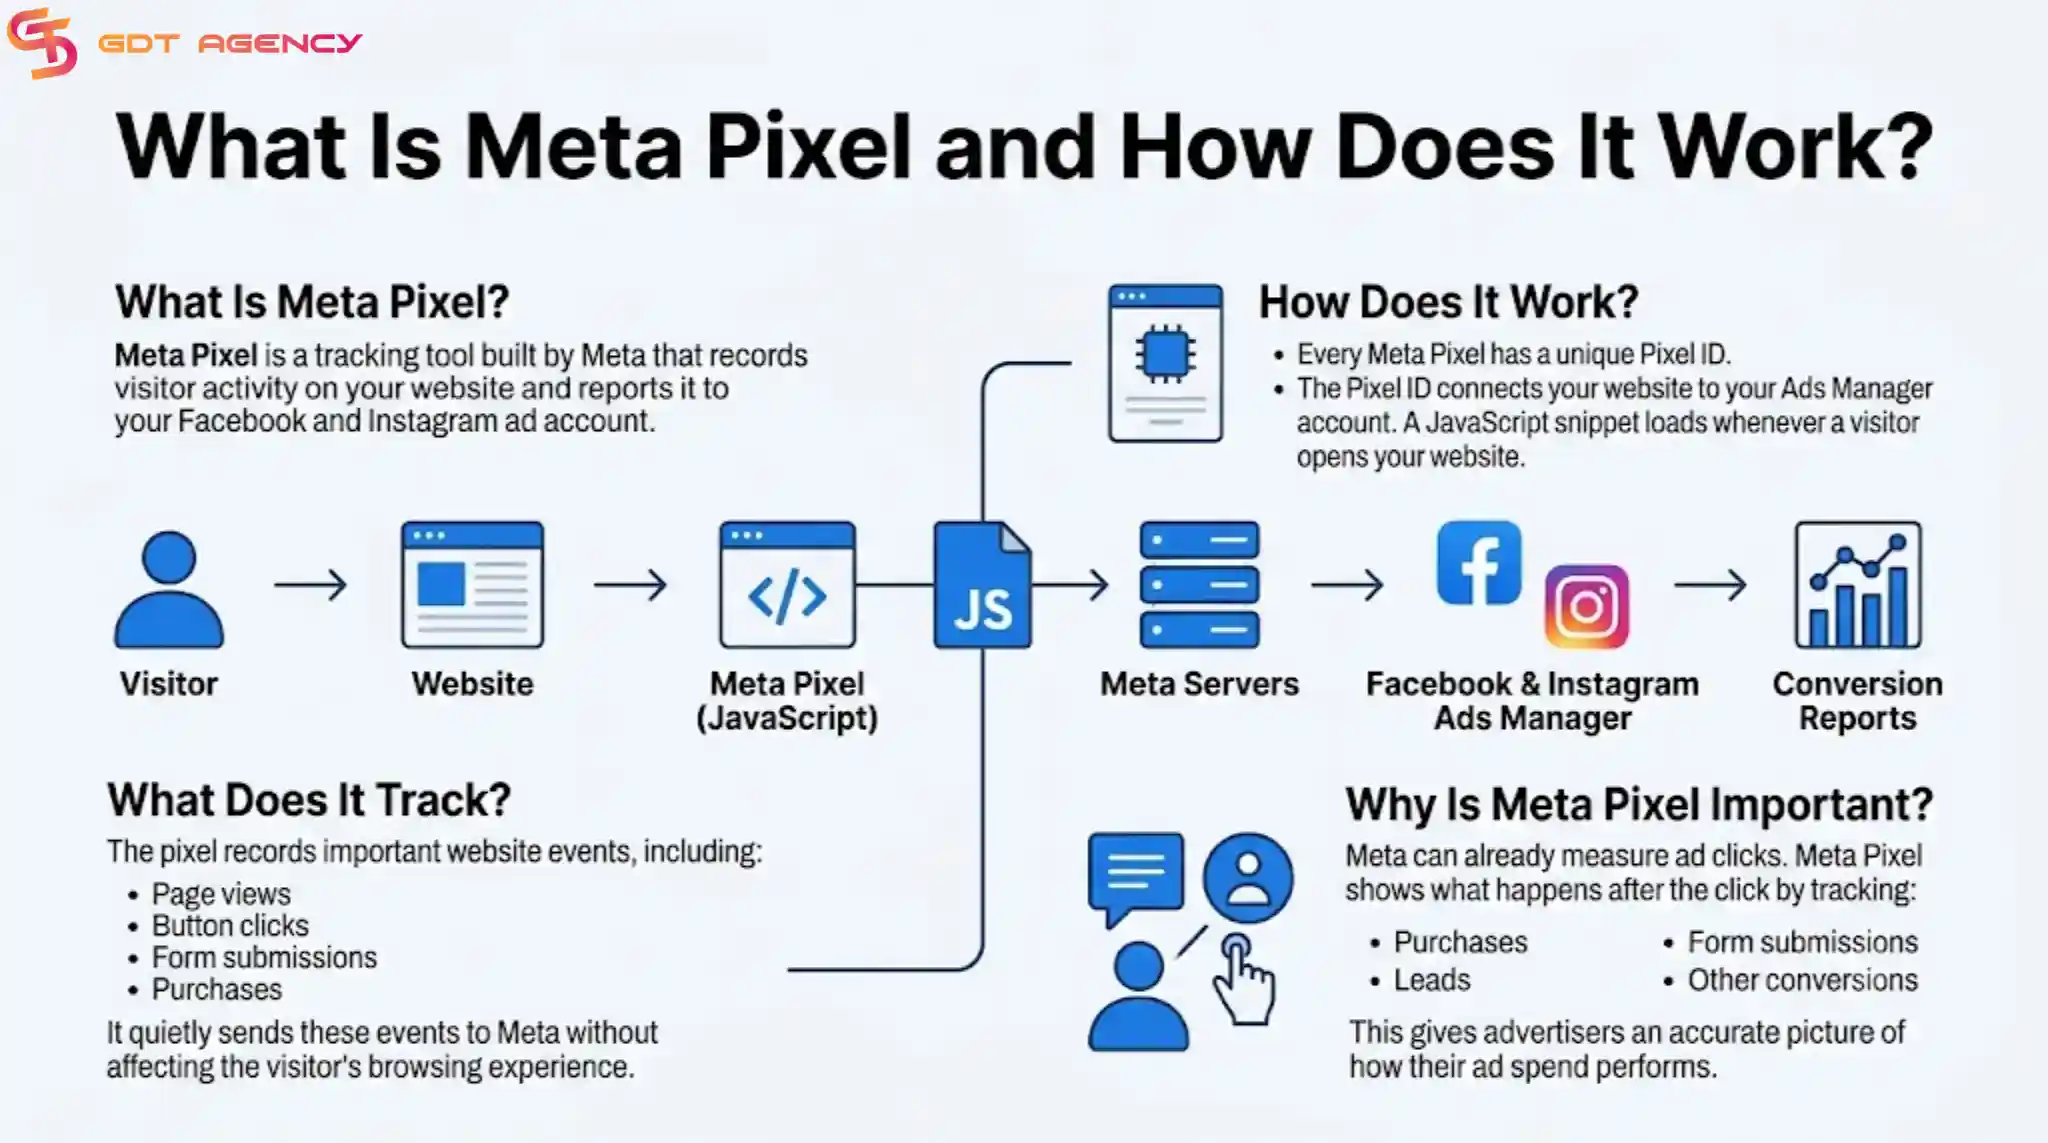
Once the Pixel ID is set and the base code sits on your site, the mechanism itself is straightforward. The JavaScript snippet loads every time a visitor opens a page, and it quietly records actions such as page views, button clicks, and form submissions. It does not interrupt the page or slow down the visitor's experience in any noticeable way. Instead, it sends small signals back to Meta's servers each time a tracked action happens.
This is also why Meta Pixel matters more than most advertisers assume at first. Ad platforms can measure clicks on their own, since that happens on their side of the process. What they cannot see without a pixel is what happens after the click, whether the visitor bought something, left the site, or filled out a form. The pixel closes that gap and gives you a real picture of what your ad spend actually produces.
→ Because every pixel belongs to a Facebook ad account, before setting up a pixel, you should understand What Is a Facebook Ad Account and How Does It Work, since every pixel is created, managed, and connected through an ad account in Meta Events Manager.
Meta Pixel tracks visitor activity from the browser, while Conversions API sends the same kind of event data directly from your server, which makes Conversions API more reliable when cookies get blocked or browser tracking gets restricted.
Meta Pixel depends on JavaScript running inside a visitor's browser, and that dependency is exactly where its main weakness sits. If a visitor blocks cookies, runs an ad blocker, or uses privacy settings that limit script tracking, the pixel can miss the event entirely.
Conversions API avoids that weak point by sending data server to server, bypassing the browser altogether. This does not mean one tool replaces the other. Most businesses run Pixel and Conversions API side by side, and Meta automatically deduplicates any overlapping events between the two, so combining them improves data accuracy without creating duplicate reports in Ads Manager.
iOS 14 affects Meta Pixel tracking through Apple's App Tracking Transparency framework, which requires apps to ask users for permission before tracking their activity, and most users who decline that permission reduce the data Meta Pixel can collect from iOS devices.
To adjust to this shift, Meta introduced Aggregated Event Measurement. This system limits how many events you can track per domain and processes the data in an aggregated, delayed format instead of reporting it in real time. The tradeoff is clear: you get less precision than before, but you keep some level of measurement rather than losing iOS data entirely. If your ad account targets an iOS-heavy audience, expect a gap between what Ads Manager reports and what actually happened, and treat that gap as normal rather than as a sign something is broken.
You fix common Meta Pixel errors by checking the diagnostics tab inside Events Manager first, since it flags most issues directly and often points to the exact page or event causing the problem.
Two errors show up more often than the rest. The first is a pixel that does not fire at all, which usually points back to a placement issue, where the code sits in the wrong part of the page or gets blocked by another script running before it. The second is duplicate events, which usually happens when the same action gets tracked twice, often because a website plugin and a manual code snippet are both tracking the same event independently without either one knowing about the other.
Once you spot the issue through Events Manager's diagnostics, remove any duplicate code, adjust the placement if needed, and retest with Pixel Helper before assuming the fix actually worked.
You use Meta Pixel with Google Tag Manager by creating a tag inside GTM, setting a trigger for when it should fire, and publishing that tag through GTM's interface instead of editing your website's code directly.
This setup matters most for teams managing several tracking tags at once, since GTM centralizes all of them in one place rather than scattering code across different parts of a website. It also lowers the risk of breaking your site when you need to update or remove a tag, because the change happens inside GTM's container rather than inside your website's actual source files.
E-commerce businesses with multi-step purchase flows, lead generation businesses running multi-step forms, and SaaS businesses tracking trial signups benefit most from custom Meta Pixel events, since none of these actions map cleanly to a standard event.
For e-commerce businesses that use build-your-own-product configurators or multi-step checkouts, custom events help track partial completions that standard events would miss entirely. For lead generation businesses running multi-step forms, custom events can track how far a visitor gets through the form, not just whether they hit submit at the end. For SaaS businesses, actions like trial signups, feature usage, or plan upgrades do not fit into Purchase, Lead, AddToCart, or ViewContent, so custom conversions become the only practical way to measure them.
In short, any business whose core action does not fit neatly into a standard event ends up relying on custom conversions to close that gap in the data.
Meta Pixel is not a one-time setup task. You install it once, but you need to check on it regularly, add new events as your business changes, and adjust for platform updates like iOS 14. The businesses that get the most out of Meta Pixel treat it as an ongoing part of their ad strategy, not a box to check and forget.
If you only take one thing from this guide, take this: a pixel with no events, or an event that never fires, gives you nothing useful. Installation is the easy part. Verification and event setup are what actually turn the pixel into a tool you can trust to guide your ad spend.
Yes. Meta recommends running both together. Conversions API fills in gaps left by browser restrictions, but Pixel still captures useful data on its own. Meta deduplicates overlapping events, so running both does not create duplicate reports.
Data usually shows up in Events Manager within a few minutes of the pixel firing correctly. If you see nothing after 20 to 30 minutes, check placement with Pixel Helper before assuming something is broken.
Yes, you can use the same Pixel ID across multiple domains. Keep in mind that all data from those domains will combine under one pixel, so this works best when the sites belong to the same business and share similar customer actions.
The impact is small. The base code and event snippets are lightweight, and they load asynchronously, meaning they do not block your page from rendering. Poor placement, not the pixel itself, is usually what causes noticeable slowdowns.
You stop collecting new data immediately, but historical data already sent to Meta stays in your account. Ad campaigns that rely on pixel-based optimization will lose that signal going forward, which can affect performance until you reinstall a working pixel.
Yes. There is no cost to create or install a pixel. Your only cost remains your ad spend inside Ads Manager.
To fix Facebook Pixel not tracking correctly, advertisers must use the Meta Pixel Helper to confirm the tracking code fires with the correct Pixel ID,…