How to Create Facebook Ad Account: Step-by-Step Guide for Beginners


You can create Facebook ad account in about 10 minutes through Meta Business Manager, and the process comes down to 4 steps: opening Business Settings, adding a new ad account, entering your account details, and confirming the setup. To start, you need a personal Facebook profile, a Facebook Page, and access to a Meta Business Manager, since Meta no longer allows ad accounts to run outside this structure. Before you begin creating your account, you should gather three things: your business information, a Facebook Page tied to your business, and admin access to a Meta Business Manager (or the ability to create one). Skipping any of these three usually causes the setup to stall halfway through, which is the most common reason beginners get stuck. To clear this up, the sections below walk through the exact steps, then answer what comes after account creation.
- How to Create a Facebook Ad Account Step by Step?
- What Do You Need Before Creating a Facebook Ad Account?
- Step 1: Open Business Settings in Meta Business Suite
- Step 2: Click “Add” and Select “Create a New Ad Account”
- Step 3: Enter Your Ad Account Name, Time Zone, and Currency
- Step 4: Confirm and Finish Creating Your Ad Account
- What to Do After Creating Your Facebook Ad Account?
- How Do You Connect Your Ad Account to Ads Manager?
- Do You Need a Meta Business Manager to Create an Ad Account?
- Can You Create a Facebook Ad Account Without a Business Manager?
- Final Thoughts
- FAQs
- How long does it take to create a Facebook ad account?
- Can I have more than one ad account under the same Business Manager?
- Why is my new ad account restricted or limited on spending?
- Do I need to verify my business before creating an ad account?
- Can I change the ad account name after creating it?
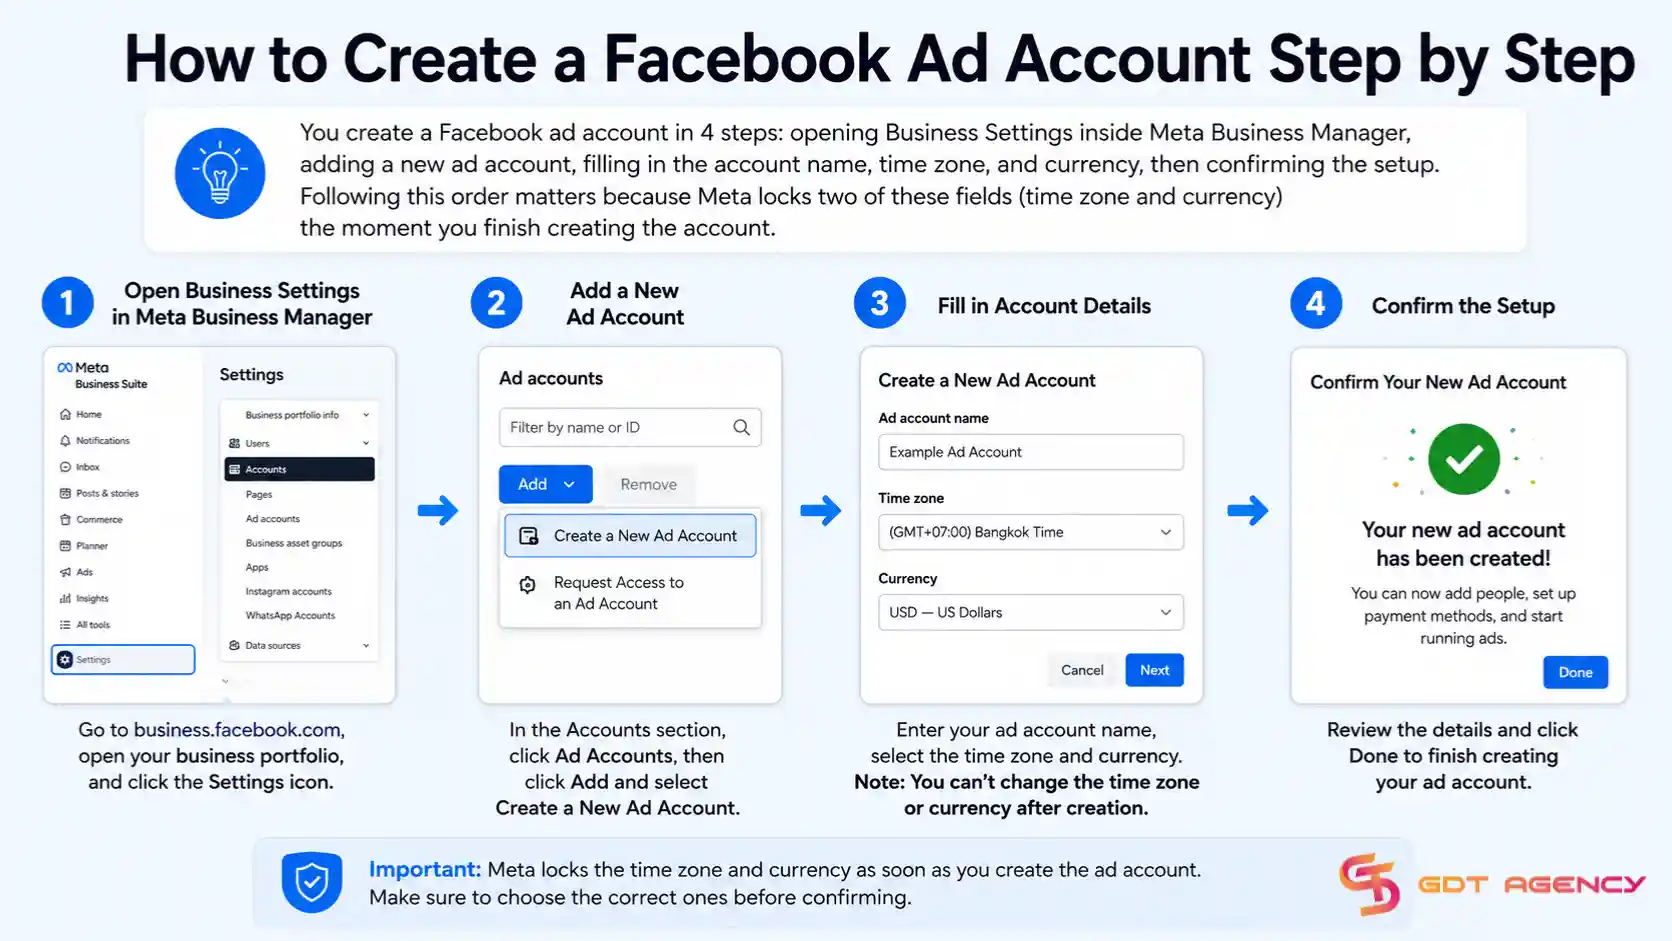
How to Create a Facebook Ad Account Step by Step?
You create a Facebook ad account in 4 steps: opening Business Settings inside Meta Business Manager, adding a new ad account, filling in the account name, time zone, and currency, then confirming the setup. Following this order matters because Meta locks two of these fields (time zone and currency) the moment you finish creating the account.
As an expert at GDT Agency with nearly 10 years of experience working with Facebook ads via multiple types of ad accounts, from the most familiar standard personal ad account to high-quality Facebook agency ad accounts, the Facebook ad account creation process is something I have handled extensively across different advertising needs, account types, and business models.
To help beginners walk through this process properly, each step that I mention below covers exactly what you need to do and why it matters, starting with what you should have ready before you even open Business Settings.
What Do You Need Before Creating a Facebook Ad Account?
You need 3 things before creating a Facebook ad account: a personal Facebook profile, a Facebook Page for your business, and a Meta Business Manager account. Without these three, the “Create a New Ad Account” option either stays greyed out or Meta blocks the account after creation, pending verification.
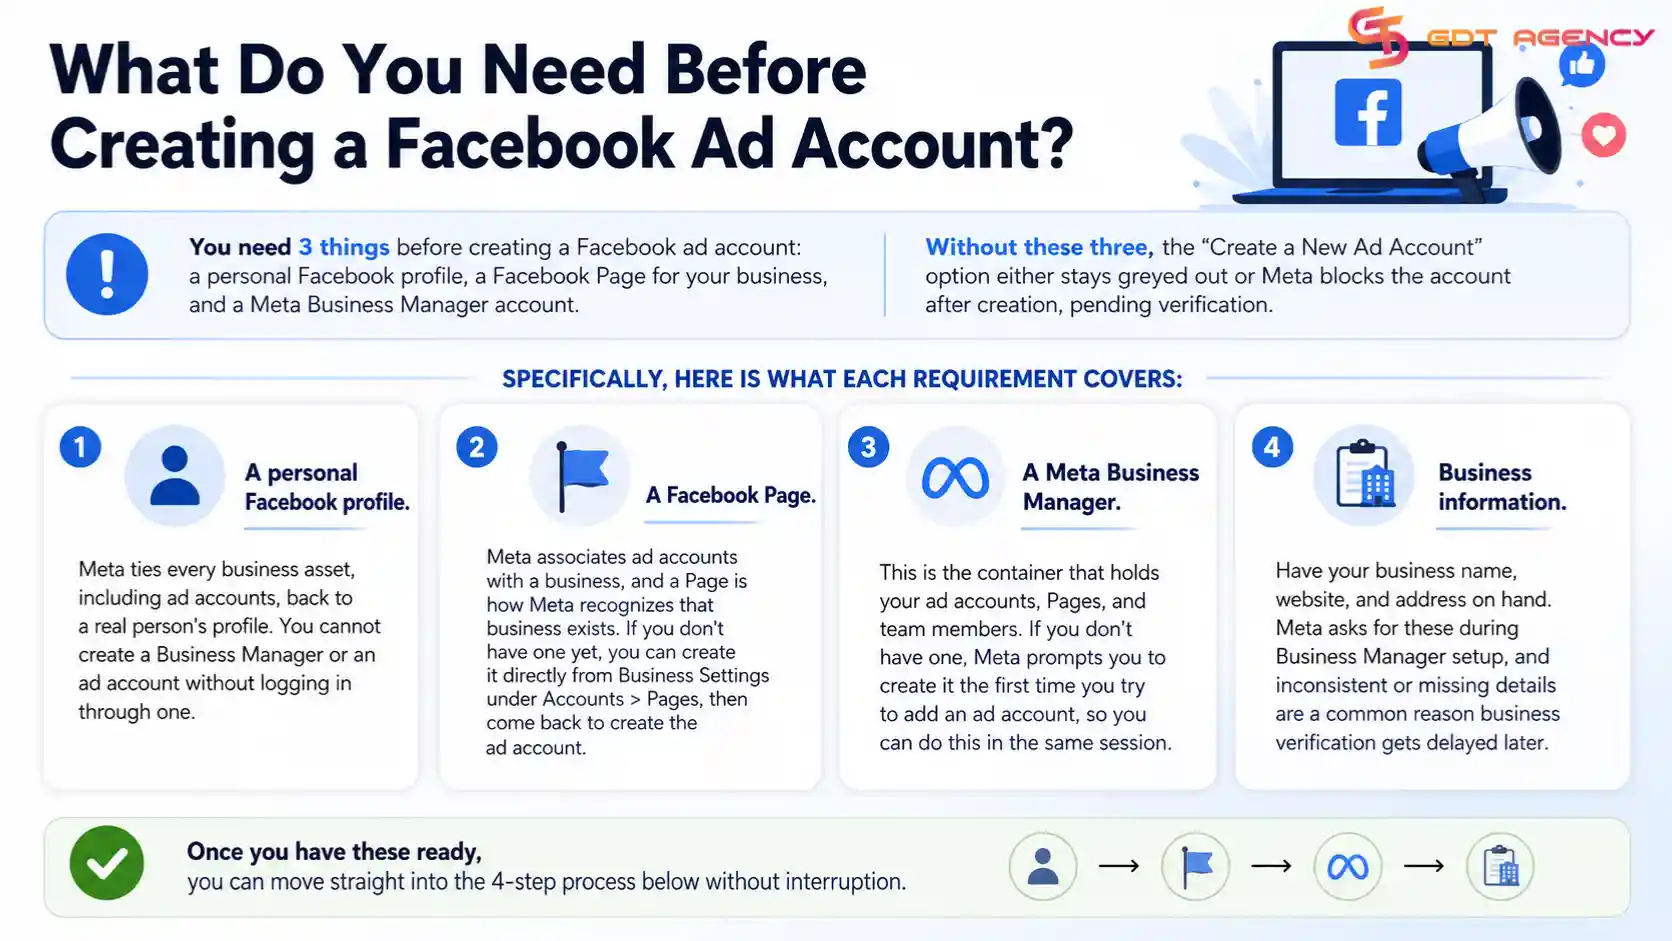
Specifically, here is what each requirement covers:
- A personal Facebook profile. Meta ties every business asset, including ad accounts, back to a real person’s profile. You cannot create a Business Manager or an ad account without logging in through one.
- A Facebook Page. Meta associates ad accounts with a business, and a Page is how Meta recognizes that business exists. If you don’t have one yet, you can create it directly from Business Settings under Accounts > Pages, then come back to create the ad account.
- A Meta Business Manager. This is the container that holds your ad accounts, Pages, and team members. If you don’t have one, Meta prompts you to create it the first time you try to add an ad account, so you can do this in the same session.
- Business information. Have your business name, website, and address on hand. Meta asks for these during Business Manager setup, and inconsistent or missing details are a common reason business verification gets delayed later.
Once you have these ready, you can move straight into the 4-step process below without interruption.
Step 1: Open Business Settings in Meta Business Suite
You start by opening Business Settings, which is the control panel where every ad account, Page, and team member lives inside Meta Business Manager. To get there, log in to business.facebook.com, then click the gear icon in the left-hand menu labeled “Business Settings.”
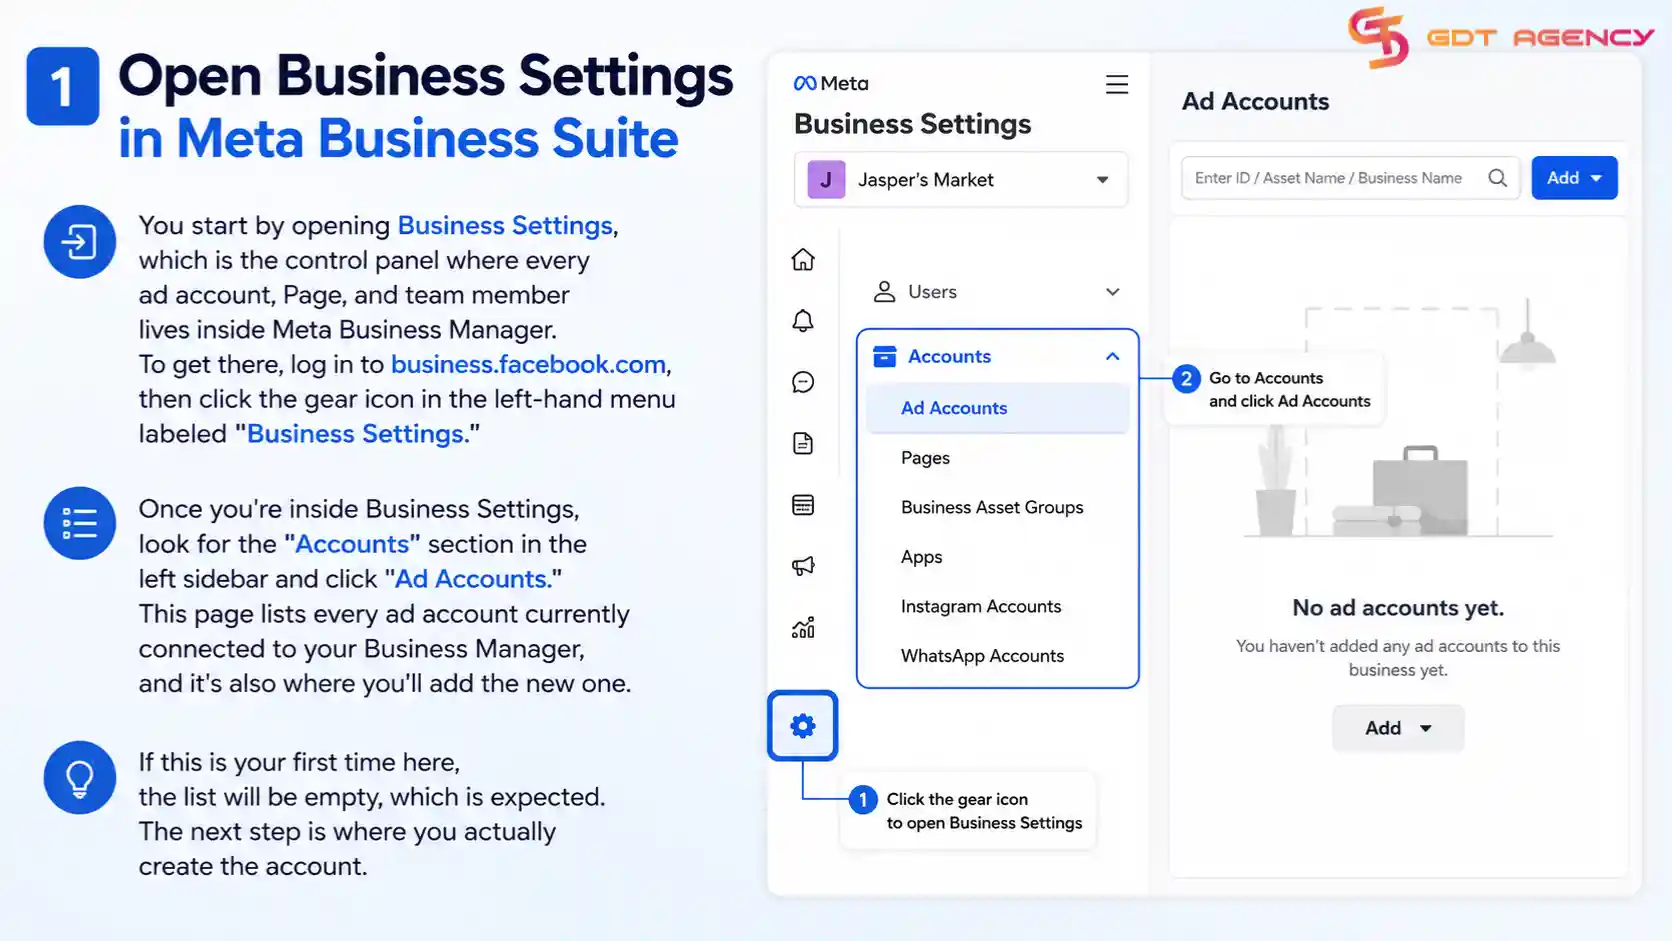
Once you’re inside Business Settings, look for the “Accounts” section in the left sidebar and click “Ad Accounts.” This page lists every ad account currently connected to your Business Manager, and it’s also where you’ll add the new one.
If this is your first time here, the list will be empty, which is expected. The next step is where you actually create the account.
Step 2: Click “Add” and Select “Create a New Ad Account”
You click the blue “Add” button at the top of the Ad Accounts page, then choose “Create a new ad account” from the dropdown that appears. This is the exact moment Meta distinguishes between three options: creating a new account, adding an existing one, or requesting access to someone else’s account. For a first-time setup, “Create a new ad account” is the one you want.
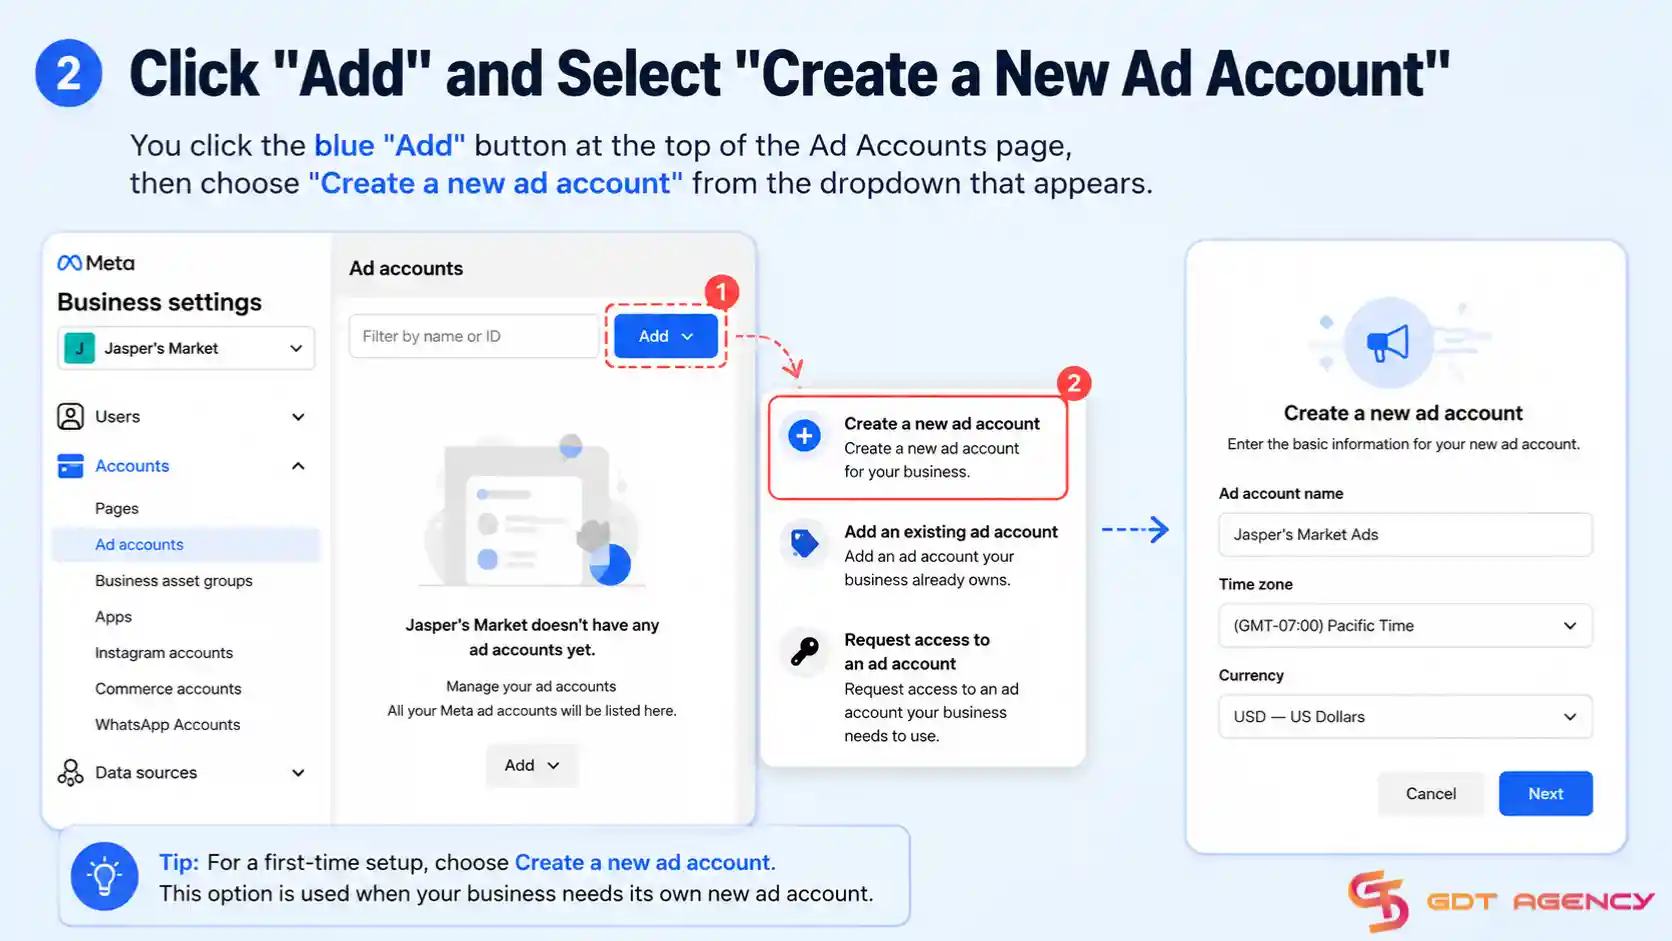
After you click it, Meta opens a short form asking for the account name, time zone, and currency. This is where the setup becomes permanent, so the next step covers each field carefully.
Step 3: Enter Your Ad Account Name, Time Zone, and Currency
You fill in three fields at this stage: the account name, the time zone, and the currency. Out of these three, time zone and currency cannot be changed after you finish creating the account, so they deserve more attention than the name.
- For the account name: use something you can recognize later, especially if you plan to manage more than one account. A format like “[Business Name] – [Market] – [Year]” works well once you’re running accounts across different countries or campaigns.
- For the time zone: set it to match your target market, not necessarily your own location. This setting controls when your daily budget resets and how your reporting windows are calculated, so a mismatch here throws off both your spending pace and your performance data.
- For the currency: choose the currency you’ll actually be billed in. Meta does not let you switch currencies later. If you need to advertise in a different currency down the line, you have to create a separate ad account rather than edit this one.
| Field | Can you change it later? | What it affects |
| Account name | Yes | Internal organization only |
| Time zone | No | Daily budget resets, reporting windows |
| Currency | No | Billing currency for the entire account |
The table above summarizes which fields in Step 3 are editable after account creation and which ones are permanent.
Step 4: Confirm and Finish Creating Your Ad Account
You finish by reviewing the details and clicking “Create.” Meta processes the account almost instantly, and it appears in your Ad Accounts list within Business Settings a few seconds later.
At this point, your ad account exists, but it isn’t fully operational yet. Meta typically places a temporary spending limit on new accounts, and you still need to add a payment method and assign yourself the correct role before you can launch a campaign. For a complete walkthrough of the setup process after account creation, you can explore a full explanation in: How to Set Up a Facebook Ad Account: A Step-by-Step Guide.
What to Do After Creating Your Facebook Ad Account?
After you create the account, three things typically need your attention: connecting it to Ads Manager, deciding whether you actually needed a Business Manager in the first place, and understanding whether Meta ever lets you skip that requirement. Walking through these clears up most of the confusion beginners run into right after setup.
How Do You Connect Your Ad Account to Ads Manager?
Your ad account connects to Ads Manager automatically, since both tools pull from the same Business Manager. However, “connected” doesn’t mean it’s the account you’ll see by default, especially if you manage more than one.
To find it, open Ads Manager and check the account name in the top-left dropdown menu. If you have several accounts, click the dropdown and select the one you just created. From there, Ads Manager shows the account’s dashboard, and you can proceed to add a payment method or build your first campaign.
If the account doesn’t appear right away, refresh the page or log out and back in. New accounts occasionally take a minute or two to sync between Business Settings and Ads Manager.
Do You Need a Meta Business Manager to Create an Ad Account?
Yes, you need a Meta Business Manager to create a standard ad account, for at least three reasons.
- First, Meta retired the option to create ad accounts directly from a personal profile, so Business Manager is now the only entry point for anyone setting up a new account.
- Second, Business Manager is what lets you separate your business assets from your personal profile, which protects your personal account if something goes wrong with billing or ad policy on the business side.
- Third, it’s the only way to add team members, agencies, or partners to an ad account without sharing your personal login.
Practically speaking, the only exception is the ad account Meta automatically generates when you first create a Page. That account is tied loosely to your personal profile rather than a Business Manager, but it’s limited in what you can do with it and is not the setup most businesses or agencies should rely on long-term.
Can You Create a Facebook Ad Account Without a Business Manager?
No, you cannot create a full-featured Facebook ad account without a Business Manager, and Meta will prompt you to create one the moment you try. The only near-exception is the auto-generated ad account tied to a new Facebook Page, but even that account works best once it’s added into a Business Manager for proper permission control and payment management.
In practice, this means the fastest path for most beginners is to create the Business Manager and the ad account in the same session, exactly as described in the steps above, rather than trying to find a workaround that skips it.
Final Thoughts
Creating a Facebook ad account comes down to four steps inside Business Settings, and the part that trips people up isn’t the creation itself. It’s getting the time zone and currency right the first time, since Meta locks both after setup. Once the account exists, connecting it to Ads Manager and adding a payment method are the two things standing between you and your first campaign.
If you’re setting up multiple accounts across different markets or clients, the same four steps apply each time, just with different account names, time zones, and currencies per market. Keeping a consistent naming pattern from the start will save you time once you’re managing more than one or two accounts.
If you’d rather skip account setup entirely, agencies and advertisers running international campaigns often rent pre-verified, agency-level ad accounts instead of creating and warming up new ones from scratch.
FAQs
How long does it take to create a Facebook ad account?
Creating the account itself takes about five minutes once your Business Manager is set up. If you need to create the Business Manager first, plan for closer to fifteen minutes total.
Can I have more than one ad account under the same Business Manager?
Yes. A single Business Manager can hold multiple ad accounts, which is common for agencies or businesses running campaigns in more than one market or for more than one brand.
Why is my new ad account restricted or limited on spending?
Meta places new accounts under a temporary spending limit while it reviews the account and payment method. This limit typically lifts on its own after a short billing history builds up, as long as no payment issues or policy flags come up.
Do I need to verify my business before creating an ad account?
No, business verification is not required to create an ad account, but Meta may request it later, especially if you plan to run ads in regulated categories or need Meta Verified status for your Page.
Can I change the ad account name after creating it?
Yes, the account name can be edited anytime from Business Settings. Time zone and currency are the only two fields that stay locked once the account is created.