
How do Facebook ad account and Business Manager differ?
A Facebook ad account is the workspace where you create, pay for, and run ads, while Business Manager is the layer above it that owns…

Setting up a Facebook ad account requires 7 steps: create a Business Manager, connect a Page, complete business verification, create the ad account, add a payment method, assign roles, and enable two-factor authentication. Each step builds on the one before it, so skipping one often causes problems later in the process. Below, we walk through the full Facebook ad account setup process in order, then answer a few broader questions about what to expect before and after you complete it.
The Facebook ad account setup process involves 7 sequential steps: creating a Business Manager, connecting a Page, completing business verification, creating the ad account itself, adding payment, assigning team roles, and enabling two-factor authentication.
Before you start these steps, it helps to understand what a Facebook ad account is and how it works. The ad account serves as the workspace where you manage campaigns, budgets, payment methods, advertising permissions, and performance data. Understanding its role makes the setup process easier to follow and helps you avoid common configuration mistakes.
As an expert at GDT Agency with nearly 10 years of experience working with Facebook ads across multiple account types, from standard to Facebook agency ad accounts, setting up a Facebook ad account is a process that I have handled countless times. Normally, I often see most advertisers finish these steps in about 15 to 20 minutes, not counting the time Facebook takes to review your business verification.
Each step depends on the one before it. You cannot create an ad account without a Business Manager, and you cannot run ads without a payment method attached. Following the steps out of order usually leads to error messages or a locked setup screen, so it helps to work through them in sequence rather than jumping ahead.
A Business Manager account is the container that holds your ad accounts, Pages, and team members in one place, and you need to create one before anything else on this list. Facebook does not let you create a standalone ad account outside of Business Manager anymore, so this step is non-negotiable for anyone advertising as a business.
Setting up the account itself is straightforward. You go to business.facebook.com, click "Create Account," and fill in a few basic fields.

You need 3 pieces of information to create a Business Manager: your business name, your name as the account administrator, and a work email address. Facebook uses these details to identify who is responsible for the account.
Use your legal business name exactly as it appears on official documents, since mismatches between your Business Manager name and your business verification documents can cause delays later. A personal Gmail or Yahoo address works to get started, but a business email tied to your company domain is safer, because it signals to Facebook that a real business sits behind the account. You will also add your business address and phone number at this stage, which Facebook cross-checks during verification.
A Facebook Page connects your Business Manager to the audience your ads will actually reach, and Facebook requires one before you can create an ad account. Without a Page, the platform has no destination to attach your ads to, since every campaign runs through a specific Page identity.
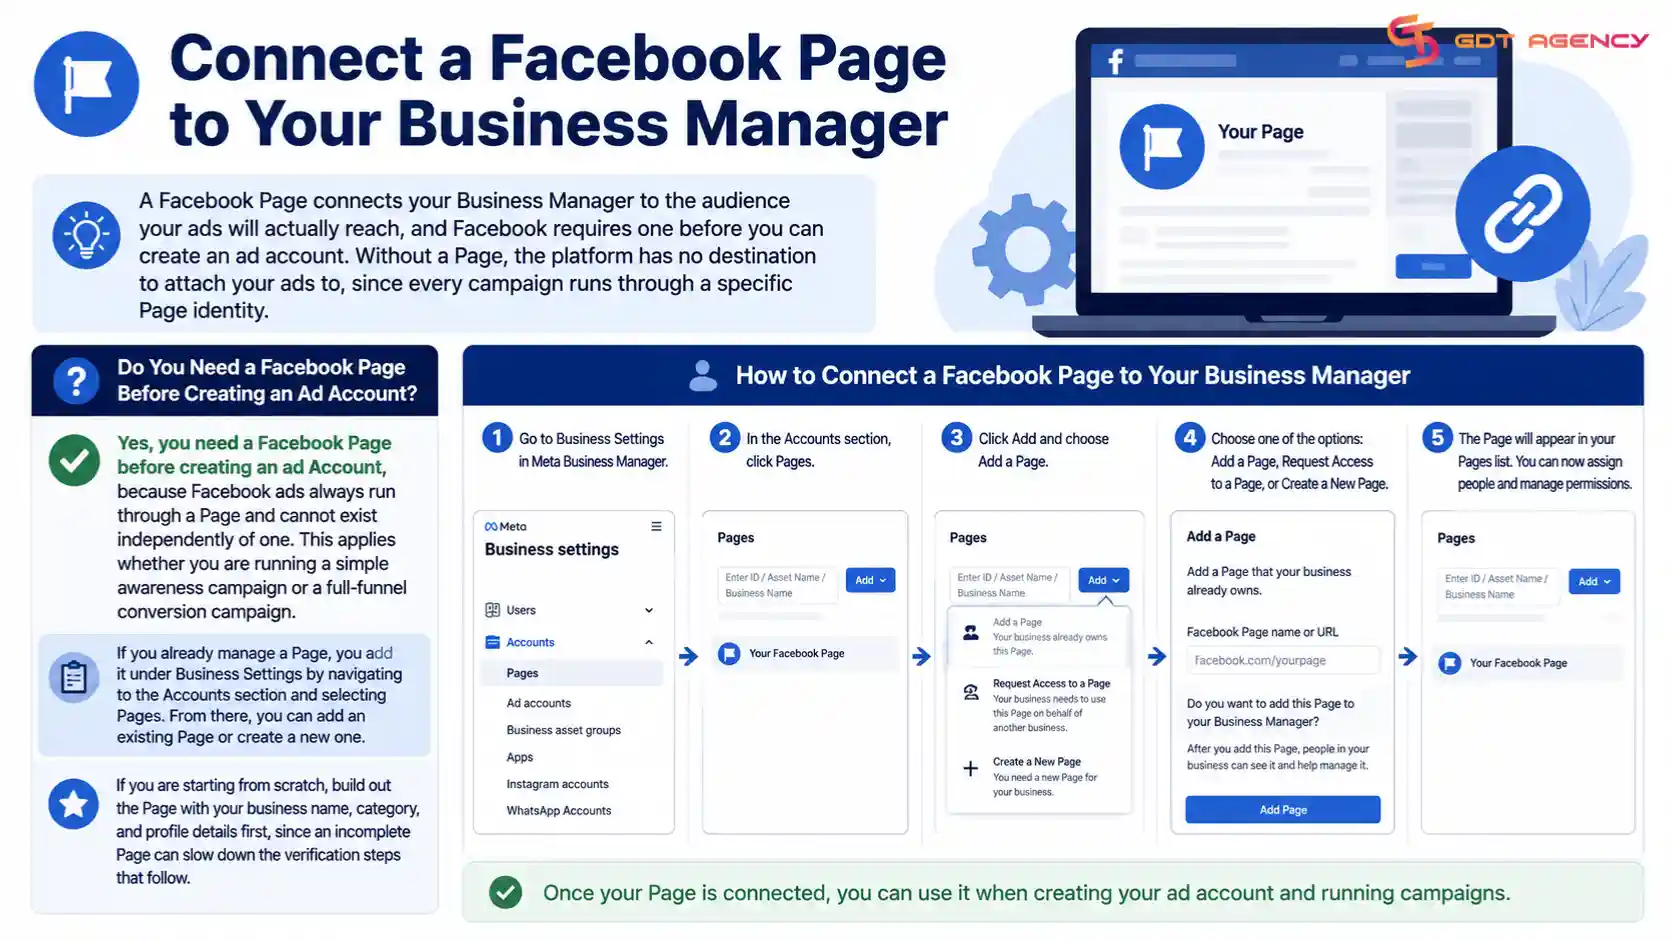
Yes, you need a Facebook Page before creating an ad account, because Facebook ads always run through a Page and cannot exist independently of one. This applies whether you are running a simple awareness campaign or a full-funnel conversion campaign.
If you already manage a Page, you add it under Business Settings by navigating to the Accounts section and selecting Pages. From there, you can add an existing Page or create a new one. If you are starting from scratch, build out the Page with your business name, category, and profile details first, since an incomplete Page can slow down the verification steps that follow.
Business verification confirms that a real, legitimate company operates behind your Business Manager, and Facebook requires it before granting full access to advertising features. This step trips up more beginners than any other part of the setup process, mainly because it involves document review rather than a simple form.

Facebook requires business verification to prevent fraud, protect users from misleading ads, and confirm that a real payer stands behind every ad account. Without this check, bad actors could create accounts, run harmful campaigns, and disappear before anyone pays the bill.
To verify your business, you typically submit documents such as a business license, tax ID, or utility bill that matches the business name on your Business Manager. Facebook cross-references this information against public business registries. Accounts that skip verification often face lower spending limits and tighter restrictions on the type of ads they can run.
Business verification typically takes one to three business days for established businesses with clean documentation, but it can stretch to two weeks for newer companies or accounts with mismatched information. Facebook reviews each submission manually in many cases, so processing time varies.
You can speed up the process by making sure your business name, address, and phone number match exactly across your Business Manager, your Page, and your submitted documents. Even small differences, like an abbreviated street name, can trigger a rejection and force you to resubmit.
Creating the ad account is the step most people picture when they think about "setting up Facebook ads," and it happens inside Business Manager once your Page and verification are in place. You navigate to Business Settings, select Ad Accounts, then choose to create a new account.

Your time zone and currency cannot be changed after you create the ad account, so choosing these correctly the first time matters more than it seems. Facebook locks both settings permanently once the account exists.
If you pick the wrong currency, you cannot simply switch it later; you have to create an entirely new ad account and start over. The same applies to time zone, which affects how your reporting data lines up with your actual ad delivery schedule. Take a moment to confirm both fields before clicking Confirm, especially if you manage accounts across different countries.
Adding a payment method connects a valid billing source to your ad account, and Facebook will not let any ad go live until this step is complete. You add it under Business Settings, in the Payments section tied to your ad account.
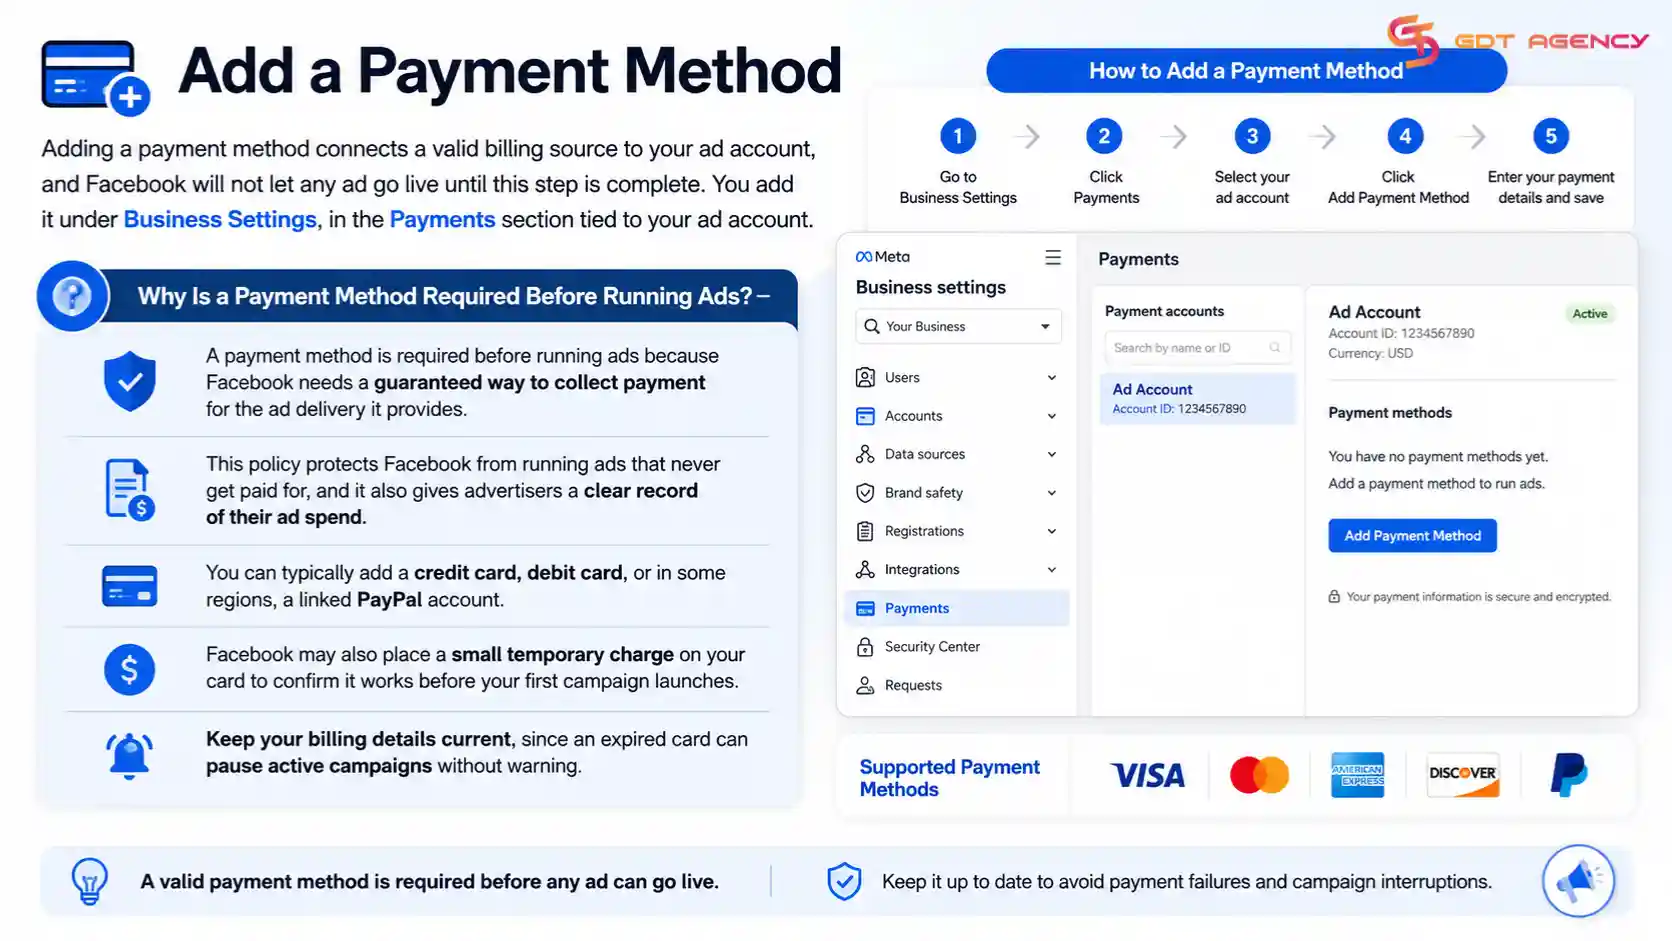
A payment method is required before running ads because Facebook needs a guaranteed way to collect payment for the ad delivery it provides. This policy protects Facebook from running ads that never get paid for, and it also gives advertisers a clear record of their ad spend.
You can typically add a credit card, debit card, or in some regions, a linked PayPal account. Facebook may also place a small temporary charge on your card to confirm it works before your first campaign launches. Keep your billing details current, since an expired card can pause active campaigns without warning.
Assigning roles determines who on your team can access and edit your ad account, and getting this right early prevents both security risks and workflow bottlenecks down the line. You manage this under Business Settings, in the People section.
Facebook offers several account roles, including admin, advertiser, and analyst, each granting a different level of access. Admins can manage every setting and add or remove other users, advertisers can create and edit campaigns without changing account structure, and analysts can view performance data without making changes.
Assign roles based on actual job responsibilities rather than convenience. Giving everyone admin access might feel simpler at first, but it increases the risk of accidental changes or, worse, a compromised login exposing your entire account. A good rule of thumb: only one or two people need full admin rights, while most team members do their job fine with advertiser or analyst access.
→ Once your ad account is ready, you may also need to give access to a client, agency, or other team member. If you are managing ads for another business, see our guide on How to Get Access to a Client's Facebook Ad Account for the steps to request and receive the right permissions without sharing login credentials
Two-factor authentication adds a second layer of login security beyond your password, and enabling it protects your ad account from unauthorized access far more effectively than a password alone. You turn it on under your personal Facebook security settings, then apply it as a requirement across your Business Manager.
Two-factor authentication matters because compromised login credentials are one of the leading causes of hijacked ad accounts, and a stolen password alone is not enough to break in once 2FA is active. Attackers who gain access to an unprotected account can drain your ad budget within hours before anyone notices.
Under Business Settings, you can require all users to enable 2FA before they access your Business Manager. This single setting closes one of the most common entry points bad actors use to take over ad accounts, so it is worth turning on even if it adds a few extra seconds to your team's login process.
Beyond the seven setup steps, a few broader questions come up often among advertisers preparing to run their first campaigns or comparing their options. These answers give you the wider context around setup, without repeating the step-by-step instructions above.
Before starting, gather a business email address, your legal business documentation, an active Facebook Page, and a valid payment method. Having these ready in advance keeps the entire process moving without unexpected pauses.
Legal documentation matters most for the verification stage, so pull together anything that clearly shows your business name and address, such as a business license or a recent utility bill. If your business Page is not yet built out, spend a few minutes filling in the basics like your business category and profile photo before you start the Business Manager setup, since Facebook sometimes reviews Page completeness alongside business verification.
The entire setup process, from creating your Business Manager to launching your first ad, typically takes about 15 to 20 minutes of active work, plus one to three business days of waiting for business verification. New businesses without an established history may wait up to two weeks for verification to clear.
This timeline assumes your documentation matches across every platform touchpoint. Advertisers who submit mismatched business names or incomplete address information often add several extra days to the process through resubmissions, so double-checking your details before submitting saves time overall.
Creating your own ad account means going through the full setup process above under your own business identity, while renting an agency ad account means using a pre-verified account managed by an agency partner, often with higher spending limits and reduced restriction risk. Advertisers typically choose the rental route when their own accounts face repeated flags or when they need to scale spend faster than a new business account allows.
New businesses sometimes struggle to build up trust with Facebook quickly enough to support aggressive ad spend, and a fresh account can trigger review holds during high-spend campaigns. An agency ad account sidesteps that friction, since it already carries a spending history and verification status. The trade-off is less direct control over account-level settings, since the agency retains ownership of the account structure, so this option suits advertisers prioritizing speed and stability over full independence.
Setting up a Facebook ad account is not difficult once you understand the order the steps need to happen in. Business Manager comes first, followed by your Page, then verification, then the account itself, payment, roles, and security. Skip a step or rush through business verification with mismatched details, and you will likely lose more time fixing the error than you would have spent doing it right the first time.
Once your account is live, the real work of running effective campaigns begins. Getting the foundation right here, especially your payment setup and security settings, keeps that work from getting interrupted by account restrictions or access problems later on.
You do not always need a formal business license to start the setup process, but you will likely need it during business verification if Facebook asks for documentation to confirm your business identity.
No, Facebook requires all ad accounts to live inside a Business Manager, and standalone ad account creation outside this structure is no longer supported for most advertisers.
If your verification gets rejected, review the mismatch between your submitted documents and your Business Manager details, correct any discrepancies, and resubmit through Business Settings.
No, currency and time zone are locked permanently once you create the ad account, so you would need to create a new account entirely to change either setting.
Facebook allows admins to require two-factor authentication for everyone accessing the Business Manager, and enabling this requirement is strongly recommended even though it is not automatically forced by default.
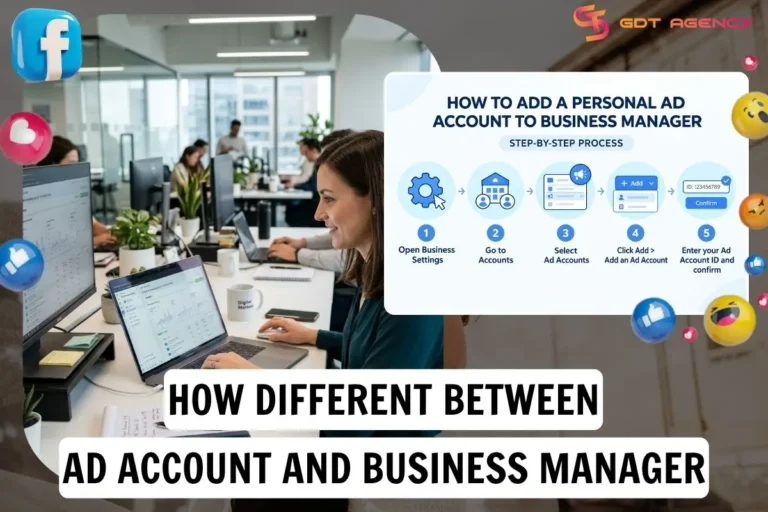
A Facebook ad account is the workspace where you create, pay for, and run ads, while Business Manager is the layer above it that owns…

Facebook Ads Manager and Business Manager differ in 6 areas: purpose, tasks, scope, team permissions, multiple brands and projects, and relationship, from main purpose to…
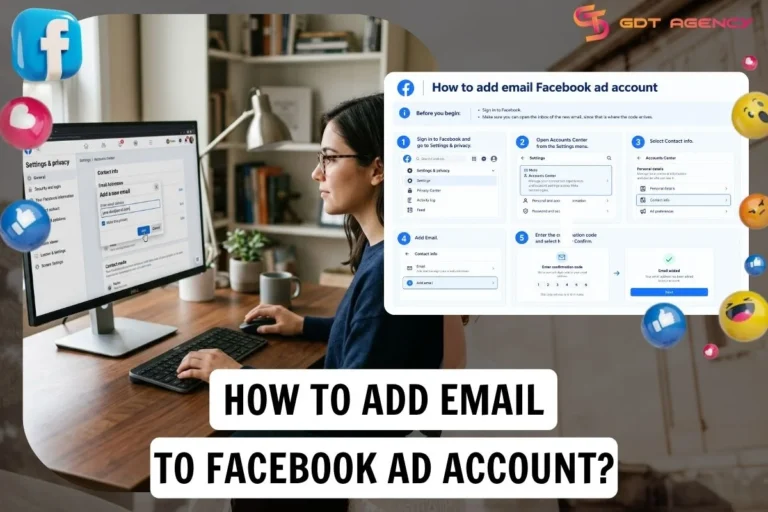
Adding email to a Facebook account takes 5 steps on both the mobile app and the website: sign in and open Accounts Center, then select…
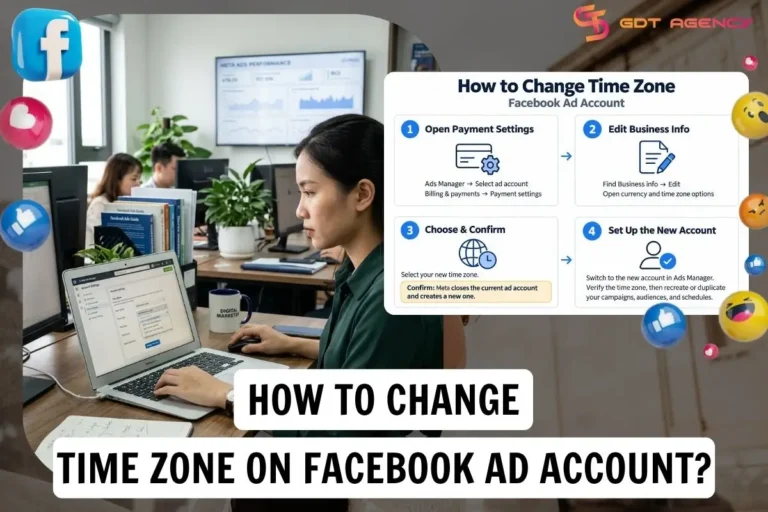
You can’t change time zone Facebook ad account once it’s been created and used. If you need to change it, you must create a new…

Changing the language on a Facebook ad account means changing the interface language in Meta Ads Manager, and you do it in 6 steps by…
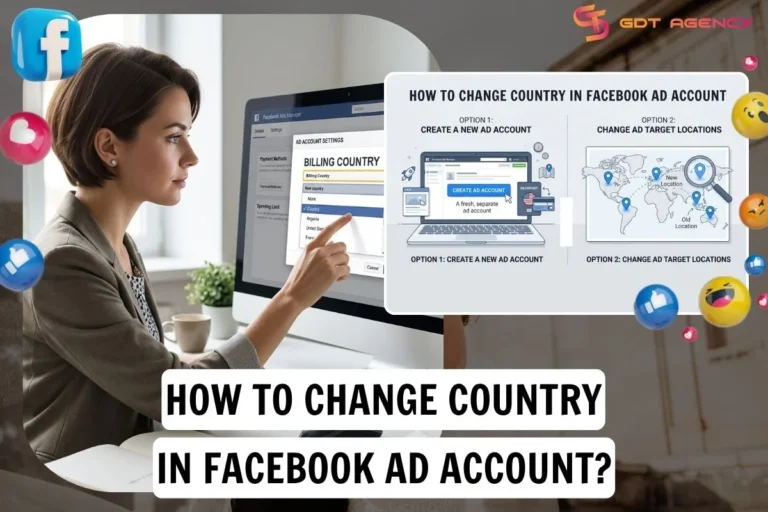
If you need to change country in Facebook ad account, the answer is no. The country is set when the ad account is created and…
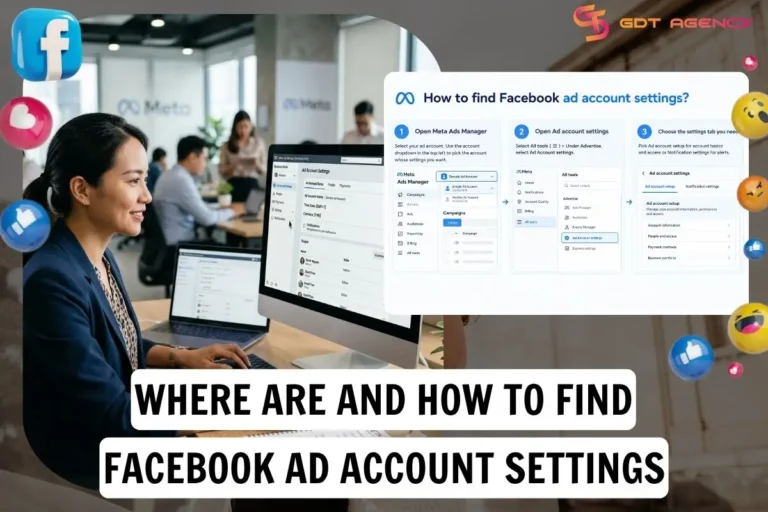
Ad account settings on Facebook aren’t a separate app or a menu on your personal profile; they’re in Meta Ads Manager and control your ad…

To change your Facebook Ads account name, you can go through Business Settings inside Meta Business Suite or edit it directly from Ads Manager. Both…

You verify your Facebook ad account by confirming your phone number, then completing business verification inside Meta Business Suite with a few core documents. Phone…

You can increase your Facebook ad account creation limit by verifying your business on Meta Business Manager and building a solid ad spend history over…